Saturday, August 15, 2015
Segment 1: Cutting the Caddy's Pieces
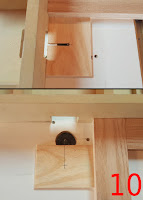
In this segment of the tutorial, I will show you the steps taken to get all of your pieces cut for the caddy. I chose to use pine for this tutorial, but you can use any species of wood that you would like. All of the pieces were cut from a 1" X 6" X 6' board. The first thing I did was layout my measurements for each piece needed. I cut all of my pieces to a rough dimension prior to cutting everything to it's final dimension (Picture 1). Now it was time to cut the pieces to their final dimensions. I used my table saw sled for these cuts because it made things much easier. I attached a stop board to the sled and made repetitive cuts. First, I cut the sides and then the bottom, handle and rails (Pictures 2 & 3). Next, I decided to focus on the side boards for the caddy. To get the angle needed on both side of the board, measure 5/8" each way from the center of the board along the top side and then measure 6-3/8" up from the bottom of the board and make a mark. Simply connect your 5/8" mark to your 6-3/8" mark and you will have your angle. The angle is completely up to you, but this is the original angle that I came up with and I like the end result (Picture 4). There are many techniques that you can use to cut the angles on your board. Since I was going to be making a bunch of caddies, I decided to make a jig to give me repetitive cuts without having to layout every board. I found out that if I set my miter gauge to 24 degrees, I would get the proper angle needed for my side pieces. I added a fence with a support board at 90 degrees to hold the side board in place while cutting. All you have to do is slide your fence along the face of the miter gauge (while set at 24 degrees) until the blade lines up with the marks on your side board. Once the blade and marks line up, add two screws to your gauge to hold the fence in place (Picture 5 & 6). After cutting the angles on both side boards, I took the board labeled "Rails" and cut two pieces off at 1-1/8". I then took those two 1-1/8" pieces and ripped them in half vertically in order to get my 4 (1-1/8" X 5/16") rail pieces (Picture 7). Now it was time to work on the handle. I decided to create a template for the handle to make my life easier since I would need so many of them for the batch of caddies that I was building. I used my bandsaw to cut the handle out and cleaned it up on my router table using a 1/2" template router bit. You can create your own template just by printing out the drawing at the beginning of the post. Simply apply the drawing to some scrap wood with adhesive spray and cut it out using a band, scroll or even hand saw. You just want to make sure that your template is perfect or else your flaw will show up on every piece you use the template on. Once again, you can come up with any design you like for the handle. Just be sure that it ends up being 8-5/8" in length in order to properly fit in between the two sides of the caddy (Picture 8). Next, I will show you how to go about making the dividers for the inside. I cut a 4" strip from a piece of 1/4" plywood. From that strip I cut three pieces. One piece at 8-5/8" and two at 5-1/2". We will need to mark the center of the 5-1/2" pieces and extended the line at least 2" down on the board. For the 8-5/8" pieces, you have to separate the board into 3 segments. Each segment is 2-7/8" in length. Mark these lines down 2" as well (Picture9). You are going to rout a 1/4" slot into each of the three pieces making sure to stop at the 2" mark. I set up my fence for the depth of the cut (2") as well as fence on the side for the piece to ride along on (Picture 10). Here is what the pieces will look like once the slots are cut in and the pieces are locked together (Picture 11). Now that we have all of the pieces cut, it is time to start the sanding process. (Picture 12). In the next segment of the tutorial, I will go through sanding, assembly, staining, applying a topcoat and installing the bottle opener. Stay tuned.
Subscribe to:
Post Comments (Atom)


No comments:
Post a Comment